Lysario – by Panagiotis Chatzichrisafis
"ούτω γάρ ειδέναι το σύνθετον υπολαμβάνομεν, όταν ειδώμεν εκ τίνων και πόσων εστίν …"
Installing OpenCV 2.4.7 on MacOS Snow Leopard and get it work with macam drivers
Author: Panagiotis31 Jan
I recently wanted to update my OpenCV installation and try to find out why my usb camera – using the macam drivers – was not working with the libraries installed on my system. So this time i had the intention to dig into the code of OpenCV release. That meant using the easy way – mac ports – to install the OpenCV libraries was not an option.
The latest OpenCV software can be downloaded at the OpenCV homepage. I downloaded OpenCV version 2.4.7 and extracted it within a local folder i created solely for OpenCV. The package comes with a cmake file (CMakeLists.txt) for creating different packages and setting up the build environment for OpenCV. cmake is open source software and is it’s purpose can be described as cross plattform build generator.That means it is used in order to provide environments for different plattforms that can be used to create a build for some project. Several tutorials and webinars may be found on the homepage of the developing company kitware. I strongly recommend the webinar “Introduction to CMake Course” in order to get an understanding of the cmake process. cmake uses special generator commands that allow you to deploy the project for different purposes. You may like to create make files for Unix for example, or prepare the project to be used with XCode. The actual available generators may be displayed (as of cmake version 2.8.3) by typing into the commandline the command cmake –help.
Here’s the excerpt of my terminal output to the command:
 So now i was ready for experimentation. The error message i got when building and running OpenCV XCode examples that were accessing a camera was “QTKit didn’t find any attached Video Input Devices !”. The same error was reported in a post by karlphillip at stackoverflow. Unfortunately i couldn’t fix my problem with the solution provided there. Debugging didn’t provide any clues why this was happening and somehow i came across a post by Andrew Janke on stackoverflow which gave me the right momentum.
The Macam version that i am using (macam-cvs-build-2009-09-25) could be build without any changes for 32 bit system while the 64 bit build failed. OpenCV (2.4.7) on the other hand is generated with 32/64 bit architecture support when running the previous mentioned cmake commands. It is possible to reconfigure the Xcode project by changing the architecture option in ccmake and regenerate the xcode build directory. Trying to built OpenCV with 32 bit support failed on my system due to incompatible libraries that were installed on my machine. The following libraries were only for 64 bit architecture available:
So now i was ready for experimentation. The error message i got when building and running OpenCV XCode examples that were accessing a camera was “QTKit didn’t find any attached Video Input Devices !”. The same error was reported in a post by karlphillip at stackoverflow. Unfortunately i couldn’t fix my problem with the solution provided there. Debugging didn’t provide any clues why this was happening and somehow i came across a post by Andrew Janke on stackoverflow which gave me the right momentum.
The Macam version that i am using (macam-cvs-build-2009-09-25) could be build without any changes for 32 bit system while the 64 bit build failed. OpenCV (2.4.7) on the other hand is generated with 32/64 bit architecture support when running the previous mentioned cmake commands. It is possible to reconfigure the Xcode project by changing the architecture option in ccmake and regenerate the xcode build directory. Trying to built OpenCV with 32 bit support failed on my system due to incompatible libraries that were installed on my machine. The following libraries were only for 64 bit architecture available:
In my case i wanted to create Xcode projects out of the source directory. For this purpose i created a new path into the directory where i downloaded and extracted the opencv software (let’s call this place[...]GeneratorsThe following generators are available on this platform: Unix Makefiles = Generates standard UNIX makefiles. Xcode = Generate Xcode project files. CodeBlocks - Unix Makefiles = Generates CodeBlocks project files. Eclipse CDT4 - Unix Makefiles = Generates Eclipse CDT 4.0 project files. KDevelop3 = Generates KDevelop 3 project files. KDevelop3 - Unix Makefiles = Generates KDevelop 3 project files.[...]
mypath_to_opencvwhere
mypath_to_opencv/opencv-2.4.7is the path to the opencv-2.4.7 sources). Start your terminal and type:
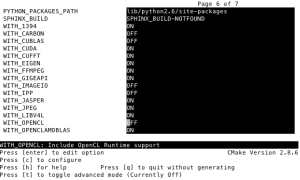
With the last command cmake is told to generate Xcode projects out of the files at the location were opencv-2.4.7 was extracted. The Xcode projects will be generated into the path where we called cmake. In the above mentioned case this path is mypath_to_opencv/xcode. If you only want to use the libraries for using the OpenCV API you may like to read Tilo Mitras article about the procedure, while i still suggest that the easiest approach is using macports. Now let’s go back to our Xcode generated build. If you look through your build tree you ‘ll find several Xcode Proejects. The top level of your build tree (xcode) includes for example mypath_to_opencv/xcode/OpenCV.xcodeproj . The samples directory, in case the sample build has been enabled in ccmake, has the Xcode project file mypath_to_opencv/xcode/samples/c/c_samples.xcodeproj In my case the standard cmake configuration had activated the OCL dependency which caused during the build in my systems problem because i have not installed any OCL driver on my system. I had to reconfigure the system and deactivate OCL by the command (yes the command below is ccmake (not cmake) a commandline configuration tool for cmake)mkdir xcode cd xcode cmake -G Xcode mypath_to_opencv/opencv-2.4.7
and switching OCL off cmake variable WITH_OPENCL.ccmake -G Xcode/opencv-2.4.7
 So now i was ready for experimentation. The error message i got when building and running OpenCV XCode examples that were accessing a camera was “QTKit didn’t find any attached Video Input Devices !”. The same error was reported in a post by karlphillip at stackoverflow. Unfortunately i couldn’t fix my problem with the solution provided there. Debugging didn’t provide any clues why this was happening and somehow i came across a post by Andrew Janke on stackoverflow which gave me the right momentum.
The Macam version that i am using (macam-cvs-build-2009-09-25) could be build without any changes for 32 bit system while the 64 bit build failed. OpenCV (2.4.7) on the other hand is generated with 32/64 bit architecture support when running the previous mentioned cmake commands. It is possible to reconfigure the Xcode project by changing the architecture option in ccmake and regenerate the xcode build directory. Trying to built OpenCV with 32 bit support failed on my system due to incompatible libraries that were installed on my machine. The following libraries were only for 64 bit architecture available:
So now i was ready for experimentation. The error message i got when building and running OpenCV XCode examples that were accessing a camera was “QTKit didn’t find any attached Video Input Devices !”. The same error was reported in a post by karlphillip at stackoverflow. Unfortunately i couldn’t fix my problem with the solution provided there. Debugging didn’t provide any clues why this was happening and somehow i came across a post by Andrew Janke on stackoverflow which gave me the right momentum.
The Macam version that i am using (macam-cvs-build-2009-09-25) could be build without any changes for 32 bit system while the 64 bit build failed. OpenCV (2.4.7) on the other hand is generated with 32/64 bit architecture support when running the previous mentioned cmake commands. It is possible to reconfigure the Xcode project by changing the architecture option in ccmake and regenerate the xcode build directory. Trying to built OpenCV with 32 bit support failed on my system due to incompatible libraries that were installed on my machine. The following libraries were only for 64 bit architecture available:
- libdc1394.dylib
- libavcodec.dylib (part of ffmpeg)
- libavformat.dylib (part of ffmpeg)
- libavutil.dylib (part of ffmpeg)
- libswscale.dylib (part of ffmpeg)
- libbz2.dylib
Leave a reply